


This post explains how to show the Blogger widgets( like links,adsense ads,etc) on your blogspot blog Homepage Only or Post Page Only:
Usually, by default.. when we add a widget item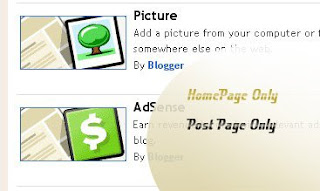 like link units, profile, Archives, Adsense ads,Pictures,etc in Blogger blog , it will be displayed in every page of the blog including the homepage, Permalink pages,etc. As you can see, I installed many widgets in this blog in sidebars like Google ads, Donate Me button ,etc which will be displayed in all the pages of the blog.
But, what if you want to display a specific widget like a blog link,ads in only the homepage and not in the post pages and viceversa? If you want to do so, this tip will come in handy...
HOMEPAGE Only widgets,links in Blogger:
→ As usual, if you want to add a new widget/gadget to your blog, just Sign into Blogger dashboard » Layout » Add a Gadget
and select the type of gadget you need and Save the Changes.
Next, we have to add a small piece of code to that widget, so.. it only displays in the Homepage. Just go to Edit html and tick on the 'Expand Widget Templates'.
Notes: Normally, the widgets in the template view starts with this one
For example, The label widget looks something like this:
and html widget looks like:
and link list looks like this:
(If you want to know exactly what the widget id you need to change, just go to your blog and view the source code and find it.
In Firefox : View » Page Source
In IE : View » Source )
Just below that widget id link, You can see a b:includable tag like this..
At this point, most of the task is completed.. Just we have to add a small piece of code below that b:includable tag..
the code is
Like this:
So, the final code looks similar like the below screenshot:
That's it! and Don't forget to Save the Changes.
Now, your desired widget/gadget can only be visible in Homepage.
Showing in only Post Pages (Permalink pages):
This will allow you to show a specific widget in only the Post Pages and not in the Homepage.
Just follow the same tutorial above but replace this code.
with this one:
Showing Widgets on a Specific Blog Post url:
If you want to dispaly a specific widget on on a particular blog post, just simply follow the above tutorial, but replace this code:
with this one:
Usually, by default.. when we add a widget item
 like link units, profile, Archives, Adsense ads,Pictures,etc in Blogger blog , it will be displayed in every page of the blog including the homepage, Permalink pages,etc. As you can see, I installed many widgets in this blog in sidebars like Google ads, Donate Me button ,etc which will be displayed in all the pages of the blog.
But, what if you want to display a specific widget like a blog link,ads in only the homepage and not in the post pages and viceversa? If you want to do so, this tip will come in handy...
HOMEPAGE Only widgets,links in Blogger:
→ As usual, if you want to add a new widget/gadget to your blog, just Sign into Blogger dashboard » Layout » Add a Gadget
and select the type of gadget you need and Save the Changes.
Next, we have to add a small piece of code to that widget, so.. it only displays in the Homepage. Just go to Edit html and tick on the 'Expand Widget Templates'.
Notes: Normally, the widgets in the template view starts with this one
<b:widget id=
For example, The label widget looks something like this:
<b:widget id='Label1' locked='false' title='Title' type='Label'>
and html widget looks like:
<b:widget id='HTML1' locked='false' title='' type='HTML'>
and link list looks like this:
<b:widget id='LinkList2' locked='false' title='Title' type='LinkList'>
(If you want to know exactly what the widget id you need to change, just go to your blog and view the source code and find it.
In Firefox : View » Page Source
In IE : View » Source )
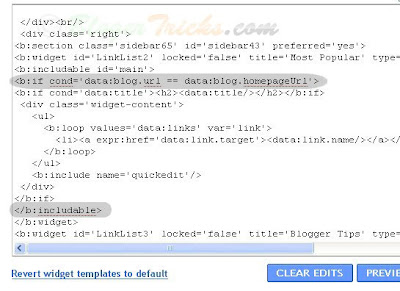
Just below that widget id link, You can see a b:includable tag like this..
<b:includable id='main'>
At this point, most of the task is completed.. Just we have to add a small piece of code below that b:includable tag..
the code is
<b:if cond='data:blog.url == data:blog.homepageUrl'>
Like this:
</b:if></b:includable>
So, the final code looks similar like the below screenshot:

That's it! and Don't forget to Save the Changes.
Now, your desired widget/gadget can only be visible in Homepage.
Showing in only Post Pages (Permalink pages):
This will allow you to show a specific widget in only the Post Pages and not in the Homepage.
Just follow the same tutorial above but replace this code.
<b:if cond='data:blog.url == data:blog.homepageUrl'>
with this one:
<b:if cond='data:blog.pageType == "item"'>
Showing Widgets on a Specific Blog Post url:
If you want to dispaly a specific widget on on a particular blog post, just simply follow the above tutorial, but replace this code:
<b:if cond='data:blog.url == data:blog.homepageUrl'>
with this one:
<b:if cond='data:blog.url == "Blog Post URL"'>


